Kubernetes MLOps 101: Deployment and usage
- Posted on July 17, 2023
- kubernetes, kubeinit, openshift, kubeflow, mlops
- By Carlos Camacho
MLOps stands for Machine Learning Operations. MLOps is a core function of Machine Learning engineering, focused on streamlining the process of taking machine learning models to production and then maintaining and monitoring them. MLOps is a collaborative function, often comprising data scientists, DevOps engineers, and IT.
Kubeflow is an open-source platform built on Kubernetes designed to simplify the deployment and management of machine learning (ML) workflows. It provides a set of tools and frameworks that enable data scientists and ML engineers to build, deploy, and scale ML models efficiently.
Kubeflow’s goal is to facilitate the adoption of machine learning best practices and enable reproducibility, scalability, and collaboration in ML workflows.
TL;DR;
This post will be an initial approach to how to deploy some MLOps tools on top of OpenSHift 4.12, among them Kubeflow, and the OpenDataHub project. The goal of this tutorial is to play with the technology and have a learning environment as fast as possible.
References for future steps, workshops, and activities
- https://developers.redhat.com/developer-sandbox/activities/use-rhods-to-master-nlp
- https://demo.redhat.com/ “MLOps with Red Hat OpenShift Data Science: Retail Coupon App Workshop”
1. Deploying the infrastructure
Requirements installation
KubeInit is a project that aims to simplify the deployment of Kubernetes distributions. It provides a set of Ansible playbooks and collections to automate the installation and configuration of Kubernetes clusters.
Install the required dependencies by running the following commands:
# Install the requirements assuming python3/pip3 is installed
python3 -m pip install --upgrade pip \
                                 shyaml \
                                 ansible \
                                 netaddr

# Clone the KubeInit repository and navigate to the project's directory
git clone https://github.com/Kubeinit/kubeinit.git
cd kubeinit

# Install the Ansible collection requirements
ansible-galaxy collection install --force --requirements-file kubeinit/requirements.yml

# Build and install the collection
rm -rf ~/.ansible/collections/ansible_collections/kubeinit/kubeinit
ansible-galaxy collection build kubeinit --verbose --force --output-path releases/
ansible-galaxy collection install --force --force-with-deps releases/kubeinit-kubeinit-`cat kubeinit/galaxy.yml | shyaml get-value version`.tar.gz
Deploy a single node 4.12 OKD cluster as our development environment
This step will get us a single-node OpenShift 4.12 development environment. From the hypervisor run:
# Run the playbook
ansible-playbook \
    -v --user root \
    -e kubeinit_spec=okd-libvirt-1-0-1 \
    -e hypervisor_hosts_spec='[{"ansible_host":"nyctea"},{"ansible_host":"tyto"}]' \
    -e controller_node_disk_size='300G' \
    -e controller_node_ram_size='88080384' \
    ./kubeinit/playbook.yml
To cleanup the environment include the -e kubeinit_stop_after_task=task-cleanup-hypervisors variable.
Depending on the value of kubeinit_spec we can choose between multiple K8s distributions,
determine how many controller or compute nodes, and how many hypervisors we will like
to spread the cluster guests, for more information go to the
Kubeinit Github repository or the
docs website.
Configuring the storage PV backend
From the hypervisor connect to the service guest by running:
ssh -i ~/.ssh/okdcluster_id_rsa [email protected]
# Install some tools
yum groupinstall 'Development Tools' -y
yum install git -y
To support the PersistentVolumeClaims (PVCs) from the Kubeflow deployment, a storage PV backend needs to be set up. We will setup some basic default storage class to support the PVC from the Kubeflow deployment. Follow the steps below to configure the backend:
# Create a new namespace for the NFS provisioner
oc new-project nfsprovisioner-operator
sleep 30;
# Deploy NFS Provisioner operator in the terminal
cat << EOF | oc apply -f -
apiVersion: operators.coreos.com/v1alpha1
kind: Subscription
metadata:
  name: nfs-provisioner-operator
  namespace: openshift-operators
spec:
  channel: alpha
  installPlanApproval: Automatic
  name: nfs-provisioner-operator
  source: community-operators
  sourceNamespace: openshift-marketplace
EOF

# We assume this is a single node deployment, we will get the first worker node
export target_node=$(oc get nodes | grep worker | head -1 | cut -d' ' -f1)
# We assign the NFS provisioner role to our first worker node
oc label node/${target_node} app=nfs-provisioner
Now, we need to configure the worker node filesystem to support the location where the PVs will be stored.
# ssh to the node
oc debug node/${target_node}

# Configure the local folder for the PVs
chroot /host
mkdir -p /home/core/nfs
chcon -Rvt svirt_sandbox_file_t /home/core/nfs
exit; exit
Setting up the container registries credentials
Connect to the worker node to configure the OpenShift registry token,
get the OpenShift registry token list (pullsecrets)
from cloud.redhat.com
and store it locally as /root/config.json
# There is a local pull-secret for pulling from the internal cluster container registry
# TODO: Make sure we have the local registry and the RHT credentials together

# By default there is a local container registry in this single node cluster
# and those credentials are deployed in the OCP cluster.

# Merge the local rendered registry-auths.json from the services guest
# With the token downloaded from cloud.redhat.com
# store it as rht-registry-auths.json and merge them with:

cd
jq -s  '.[0] * .[1]' registry-auths.json rht-registry-auths.json > full-registry-auths.json
oc set data secret/pull-secret -n openshift-config --from-file=.dockerconfigjson=full-registry-auths.json

# oc create secret generic pull-secret -n openshift-config --type=kubernetes.io/dockerconfigjson --from-file=.dockerconfigjson=/root/downloaded_token.json
# oc secrets link default pull-secret -n openshift-config --for=pull
# Refer to: https://access.redhat.com/solutions/4902871 for further information
Make sure the registry secret is correct by printing its value.
oc get secret pull-secret -n openshift-config --template=''
Or configure it in the cluster per node by (not required and done in the previous step):
ssh [email protected] # (First controller node, in this case, a single node cluster)
podman login registry.redhat.io
podman login registry.access.redhat.com
# Username: ***@redhat.com
# Password:
# Login Succeeded!
Create the NFSProvisioner Custom Resource
cat << EOF | oc apply -f -
apiVersion: cache.jhouse.com/v1alpha1
kind: NFSProvisioner
metadata:
  name: nfsprovisioner-sample
  namespace: nfsprovisioner-operator
spec:
  nodeSelector:
    app: nfs-provisioner
  hostPathDir: "/home/core/nfs"
EOF
sleep 30;

# Check if NFS Server is running
oc get pod

# Update annotation of the NFS StorageClass
oc patch storageclass nfs -p '{"metadata": {"annotations":{"storageclass.kubernetes.io/is-default-class":"true"}}}'

# Check the default next to nfs StorageClass
oc get sc
NAME            PROVISIONER       RECLAIMPOLICY   VOLUMEBINDINGMODE   ALLOWVOLUMEEXPANSION   AGE
nfs (default)   example.com/nfs   Delete          Immediate           false                  4m29s
Create a test PVC to verify the claims can be filled correctly
# Create a test PVC
cat << EOF | oc apply -f -
kind: PersistentVolumeClaim
apiVersion: v1
metadata:
  name: nfs-pvc-example
spec:
  accessModes:
    - ReadWriteMany
  resources:
    requests:
      storage: 1Mi
  storageClassName: nfs
EOF

# Check the test PV/PVC
oc get pv,pvc

NAME                                                        CAPACITY   ACCESS MODES   RECLAIM POLICY   STATUS      CLAIM                                                 STORAGECLASS   REASON   AGE
persistentvolume/pvc-e30ba0c8-4a41-4fa0-bc2c-999190fd0282   1Mi        RWX            Delete           Bound       nfsprovisioner-operator/nfs-pvc-example               nfs                     5s
NAME                                    STATUS   VOLUME                                     CAPACITY   ACCESS MODES   STORAGECLASS   AGE
persistentvolumeclaim/nfs-pvc-example   Bound    pvc-e30ba0c8-4a41-4fa0-bc2c-999190fd0282   1Mi        RWX            nfs            5s
The output shown here indicates that the NFS server, NFS provisioner, and NFS StorageClass are all working fine. You can use the NFS StorageClass for any test scenarios that need PVC.
The following snippets allow to play with the applications deployed to the single-node cluster providing an easy revert option.
Note: For rollbacking the env and try new things, instead of redeploying (30 mins) try restoring the snapshots (1 min).
########
# BACKUP
vms=( $(virsh list --all | grep running | awk '{print $2}') )
# Create an initial snapshot for each VM
for i in "${vms[@]}"; \
do \
echo "virsh snapshot-create-as --domain $i --name $i-fresh-install --description $i-fresh-install --atomic"; \
virsh snapshot-create-as --domain "$i" --name "$i"-fresh-install --description "$i"-fresh-install --atomic; \
done
# List current snapshots (After they should be already created)
for i in "${vms[@]}"; \
do \
virsh snapshot-list --domain "$i"; \
done
########

#########
# RESTORE
vms=( $(virsh list --all | grep running | awk '{print $2}') )
for i in "${vms[@]}"; \
do \
virsh shutdown $i;
virsh snapshot-revert --domain $i --snapshotname $i-fresh-install --running;
virsh list --all;
done
#########

#########
# DELETE
vms=( $(virsh list --all | grep -E 'running|shut' | awk '{print $2}') )
for i in "${vms[@]}"; \
do \
virsh snapshot-delete --domain $i --snapshotname $i-fresh-install;
done
#########
2. Deploying the MLOps applications
This section will explore the installation of different MLOps components in an OCP 4.12 cluster.
Select one subsection exclusively (2.1, 2.2, or 2.3 but not all of them).
From the services pod execute:
2.1 Deploying the Kubeflow pipelines component
###################################
# Installing the Kubeflow templates
# https://www.kubeflow.org/docs/components/pipelines/v1/installation/localcluster-deployment/#deploying-kubeflow-pipelines
#
###############################
# Kubeflow pipelines standalone
# We will deploy kubeflow 2.0.0
#
cd
export PIPELINE_VERSION=2.0.0
kubectl apply -k "github.com/kubeflow/pipelines/manifests/kustomize/cluster-scoped-resources?ref=$PIPELINE_VERSION"
kubectl wait --for condition=established --timeout=60s crd/applications.app.k8s.io
kubectl apply -k "github.com/kubeflow/pipelines/manifests/kustomize/env/platform-agnostic-pns?ref=$PIPELINE_VERSION"
sleep 30
oc get pods -n kubeflow

NAME                                               READY   STATUS    RESTARTS      AGE
cache-deployer-deployment-76f8bc8897-t48vs         1/1     Running   0             3m
cache-server-65fc86f747-2rg7t                      1/1     Running   0             3m
metadata-envoy-deployment-5bf6bbb856-tqw85         1/1     Running   0             3m
metadata-grpc-deployment-784b8b5fb4-l94tm          1/1     Running   3 (52s ago)   3m
metadata-writer-647bfd9f77-m5c8w                   1/1     Running   0             3m
minio-65dff76b66-vstbk                             1/1     Running   0             3m
ml-pipeline-86965f8976-qbgqs                       1/1     Running   0             3m
ml-pipeline-persistenceagent-dbc9d95b6-g7nsb       1/1     Running   0             3m
ml-pipeline-scheduledworkflow-6fbf57b54d-446f5     1/1     Running   0             2m59s
ml-pipeline-ui-5b99c79fc8-2vbcp                    1/1     Running   0             2m59s
ml-pipeline-viewer-crd-5fdb467bb5-rktvs            1/1     Running   0             2m59s
ml-pipeline-visualizationserver-6cf48684f5-b929v   1/1     Running   0             2m59s
mysql-c999c6c8-jzths                               1/1     Running   0             2m59s
workflow-controller-6c85bc4f95-lmkrg               1/1     Running   0             2m59s
##########################
To access the Kubeflow pipelines UI, follow these steps:
# Create an initial SSH hop from your machine to the hypervisor
ssh -L 38080:localhost:38080 root@labserver
# A second hop will connect you to the services guest
ssh -L 38080:localhost:8080 -i ~/.ssh/okdcluster_id_rsa [email protected]
# Once we are in a network segment with access to the Kubeflow services
# we can forward the traffic to the ml-pipeline-ui pod
kubectl port-forward -n kubeflow svc/ml-pipeline-ui 8080:80
After running the hop/forwarding commands, you can access the Kubeflow
pipelines UI by opening your browser and visit http://localhost:38080
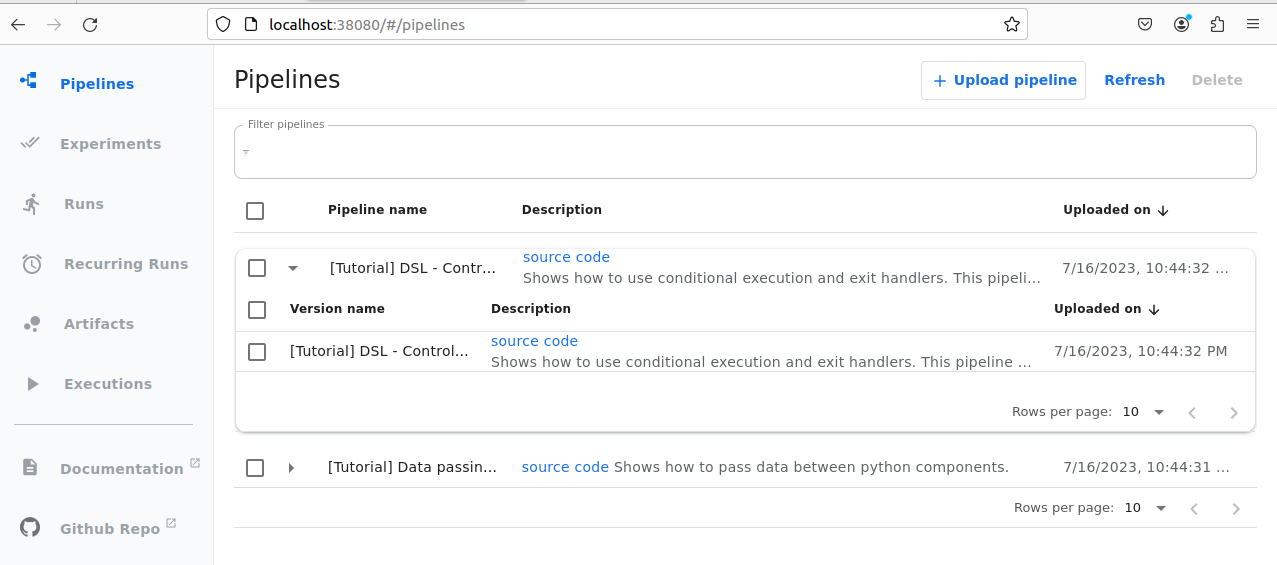
Once all the pods are running the UI should work as expected without reporting any issue.
2.2 Deploying the modelmesh service operator
cd
git clone https://github.com/opendatahub-io/modelmesh-serving.git --branch release-v0.11.0-alpha
cd modelmesh-serving
cd opendatahub/quickstart/basic/
./deploy.sh
Make sure the pvc, replicaset, pod, and service are all running before continuing.
# Check the OpenDataHub ModelServing's inference service
oc get isvc -n modelmesh-serving
# NAME                 URL                                               READY   PREV   LATEST   PREVROLLEDOUTREVISION   LATESTREADYREVISION   AGE
# example-onnx-mnist   grpc://modelmesh-serving.modelmesh-serving:8033   True                                                                  42m
#Check the URL for the deployed model
oc get routes
# NAME                 HOST/PORT                                                             PATH                            SERVICES            PORT   TERMINATION     WILDCARD
# example-onnx-mnist   example-onnx-mnist-modelmesh-serving.apps.okdcluster.kubeinit.local   /v2/models/example-onnx-mnist   modelmesh-serving   8008   edge/Redirect   None
Let’s test a model from the manifests folder.
export HOST_URL=$(oc get route example-onnx-mnist -ojsonpath='{.spec.host}' -n modelmesh-serving)
export HOST_PATH=$(oc get route example-onnx-mnist -ojsonpath='{.spec.path}' -n modelmesh-serving)
export COMMON_MANIFESTS_DIR='/root/modelmesh-serving/opendatahub/quickstart/common_manifests'
curl --silent --location --fail --show-error --insecure https://${HOST_URL}${HOST_PATH}/infer -d  @${COMMON_MANIFESTS_DIR}/input-onnx.json

# This is the expected output
# {"model_name":"example-onnx-mnist__isvc-b29c3d91f3","model_version":"1","outputs":[{"name":"Plus214_Output_0","datatype":"FP32","shape":[1,10],"data":[-8.233053,-7.7497034,-3.4236815,12.3630295,-12.079103,17.266596,-10.570976,0.7130762,3.321715,1.3621228]}]}
2.3 Deploying all Kubeflow components (WIP pending failing resources)
##########################
# Complete install
# From: https://github.com/kubeflow/manifests#installation
cd
git clone https://github.com/kubeflow/manifests kubeflow_manifests
cd kubeflow_manifests
while ! kustomize build example | awk '!/well-defined/' | kubectl apply -f -; do echo "Retrying to apply resources"; sleep 10; done
##########################

# WIP checking Security Context Constraints by executing:

# We deploy all the Security Context Constraints
# cd
# git clone https://github.com/opendatahub-io/manifests.git ocp_manifests
# cd ocp_manifests
# while ! kustomize build openshift/openshiftstack/application/openshift/openshift-scc/base | kubectl apply -f -; do echo "Retrying to apply resources"; sleep 10; done
# while ! kustomize build openshift/openshiftstack/application/openshift/openshift-scc/overlays/istio | kubectl apply -f -; do echo "Retrying to apply resources"; sleep 10; done
# while ! kustomize build openshift/openshiftstack/application/openshift/openshift-scc/overlays/servicemesh | kubectl apply -f -; do echo "Retrying to apply resources"; sleep 10; done
Checking that all the services are running
To ensure that all services that were deployed are running, check pod, service, replicaset, deployment, and pvc.
3. Running Kubeflow (Creating experiments, pipelines, and executions)
Kubeflow simplifies the development and deployment of machine learning pipelines by providing a higher level of abstraction over Kubernetes. It offers a resilient framework for distributed computing, allowing ML pipelines to be scalable and production-ready.
In this section, we will explore the process of creating a machine learning pipeline using Kubeflow, covering various components and their integration throughout the ML solution lifecycle, that is creating the experiment, pipeline, and run.
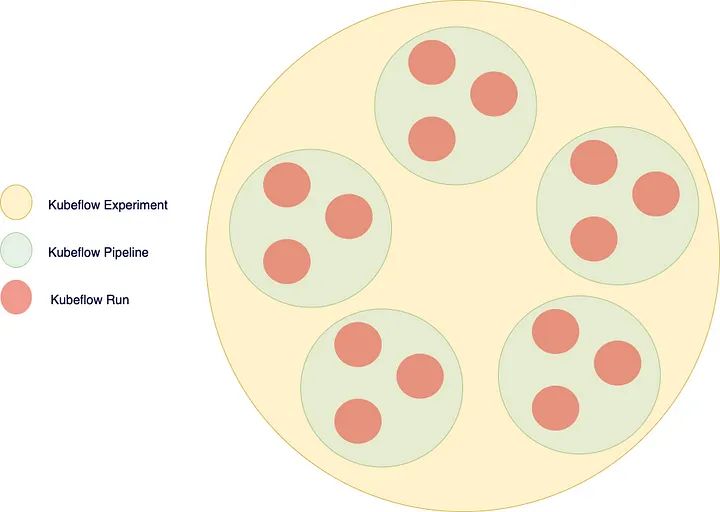
The following components are the main organizational structure within Kubeflow.
-
A Kubeflow Experiment is a logical grouping of machine learning runs or trials. It provides a way to organize and track multiple iterations of training or evaluation experiments. Experiments help in managing different versions of models, hyperparameters, and data configurations.
-
A Kubeflow Pipeline is a workflow that defines a series of interconnected steps or components for an end-to-end machine learning process. It allows for the orchestration and automation of complex ML workflows, including data preprocessing, model training, evaluation, and deployment. Pipelines enable reproducibility, scalability, and collaboration in ML development by providing a visual representation of the workflow and its dependencies.
-
A Kubeflow Run refers to the execution of a pipeline or an individual component within a pipeline. It represents a specific instance of running a pipeline or a component with specific inputs and outputs. Runs can be triggered manually or automatically based on predefined conditions or events. Each run captures metadata and logs, allowing for easy tracking, monitoring, and troubleshooting of the pipeline’s execution.
Running our first experiment
Text
Creating an experiment
Text
Creating the pipeline
Text
Running the pipeline
Text
Conclusions
Deploying Kubeflow using KubeInit simplifies the process of setting up a scalable and reproducible ML workflow platform. With KubeInit’s Ansible playbooks and collections, you can automate the deployment of Kubernetes and easily configure the necessary components for Kubeflow. By leveraging Kubeflow’s templates and services, data scientists and ML engineers can accelerate the development and deployment of machine learning models.
Interesting errors
  Warning  Failed          8m1s (x6 over 11m)   kubelet            Error: ImagePullBackOff
  Warning  Failed          6m16s (x5 over 11m)  kubelet            Failed to pull image "mysql:8.0.29": rpc error: code = Unknown desc = reading manifest 8.0.29 in docker.io/library/mysql: toomanyrequests: You have reached your pull rate limit. You may increase the limit by authenticating and upgrading: https://www.docker.com/increase-rate-limit
  Normal   BackOff         103s (x28 over 11m)  kubelet            Back-off pulling image "mysql:8.0.29"
The end
If you like this post, please try the code, raise issues, and ask for more details, features, or anything that you feel interested in. Also, it would be awesome if you become a stargazer to catch up updates and new features.
This is the main repository for the infrastructure automation based on Ansible.
Happy Kubeflow’ing & Kubeinit’ing!
Responses
Want to leave a comment? Visit this post's issue page on GitHub (you'll need a GitHub account. What? Like you already don't have one?!).